I would like to start off by pointing out that there is not a single textbook way to do a squat, or most exercises for that matter. We are all different shapes and sizes, no one is completely symmetrical, the structure of our anatomy is different from person to person. Think about it, some people have wider hip sockets, some narrower; some people have a greater hip range of motion, others not so much; some people have longer femurs and others shorter. You get my point?
So why does it make sense for everyone to squat the same way?
It doesn’t.
It’s about fitting the exercise to the person, not the person to the exercise. Playing around with stances and movement patterns to find the most comfortable and safest way for you to move and reap all of the benefits from the exercise.
So don’t worry if your squat isn’t textbook perfect, mine isn’t. My right foot tends to drift out to the side like a penguin. I still move well, it doesn’t cause me any discomfort, and I can still squat 100Kg.
ANYWAY.
Let’s talk about how to squat, and how you can progress from body weight squats to barbell squats. You’ll be dreaming about squats and barbell back flips.
The TRX Squat
If you find yourself lacking strength and stability with unassisted body weight squats, then the TRX Squat is a great place to start. By holding on to the TRX, you can use your arms to help pull yourself up to compensate for the weaker muscles. The straps are also going to help you sit back onto your heels compared to if you weren’t holding on to them, which in turn ensures that your knees don’t track excessively beyond the front of your toes.
As you progress, you should be able to minimise the use of the straps for support, so that all strength of your squat is coming from your legs.
A few general checkpoints are:
- Make sure your knees are pushed out at all times.
- Brace your core so that you have a nice straight line going down your back.
- Sit back on your heels so you don’t come up onto your toes.

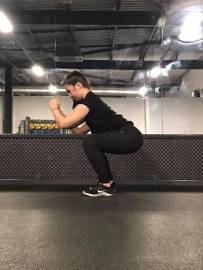
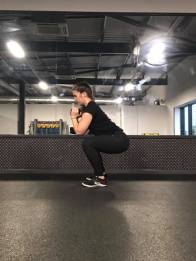
Unassisted Body Weight Squat
By now you have the strength and stability to squat without the support of a TRX, so its time to look at unassisted body weight squats.
Here’s a generic idea of how to squat.
- Stand with your feet about a shoulder width apart and have your toes facing forward.
- Your feet are the base of your support, so you want to make sure you create a strong stable foundation with your feet to keep your knees and hips in proper alignment. Your feet must be on the floor at all times; as you lower into your squat, sit back on the heels of your feet and push through the outside of your feet.
- Brace your core at all times, ensuring you have a nice straight line down your back. Practising bracing your core at this stage is going to help you a tonne whe it comes to knowing how to brace your core when you’re squatting load.
- On the way up and down, make sure you’re focusing on pushing your knees out, and they’re not caving in.
- Aim to squat at least parallel.
Like I said, this is a generic idea of how to squat, as it always depends on each individual circumstance. However, some aspects are more or less non-negotiable: your knees should be pushed out at all times, your core should be braced, your feet should be on the floor at all times.
Dumbbell Front Squat
The dumbbell front squat is a great way to start getting used to squatting with load when you squat, without jumping straight to a barbell on your back. You’ll start to get a feel for what it means to brace your core now that you’re squatting with load. A barbell usually weighs 20Kg; using a dumbbell you can gradually build up your strength and confidence starting with a lighter load and increasing the weight over time. You can also use a kettle-bell instead.
Front squats differ to back squats in that the placement of the bar/dumbbell means that the recruitment of each muscle is slightly different. For example, both front squats and back squats recruit the hips, hamstrings, glutes, quads, lower back and upper back, but front squats zone in more on your quads compared to back squats. We’ll discuss more on barbell front squats in another article.
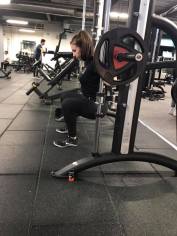
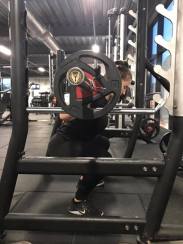
The Smith Machine Squat
The smith machine squat can be beneficial, because the bar is attached to the rack, meaning that you can still focus on developing your squat strength and form without the added stability challenge; with the bar just travelling up and down rather than forward and back in a more unwieldy motion (you don’t need to worry about falling).
In addition to this, the smith machine squat will also allow you to target muscles more specifically, by adjusting your foot placement. For example by moving your feet forward; the barbell back squat won’t always allow this.
When I’m working with my clients, I find the majority of them are good to go straight into back squats once they’ve developed their strength and fine tuned their form with the previous squat variations. It will help having me by their side to keep an eye on their form and to make sure the barbell doesn’t go anywhere. If you’re confident enough that you’ve built up enough strength, fine tuned your form and can brace your core under more load then by all means, give the barbell back squat a go.
The Barbell Back Squat
The Set Up
- The first step is to get the barbell into position. Set the bar on the hooks at roughly shoulder level and add the desired weight. Don’t forget to factor in the weight of the bar.
- Stand under the barbell with your feet about a shoulder width apart, with the centre of the bar in the middle of the fleshy part on your upper back.
- Grip the bar with your hands at an equal distance apart from the centre of the bar.
- I like to squeeze my shoulder blades together to create a firm shelf-like surface barbell to sit on.
- Brace your core before un-racking the barbell. Take a deep breath in into your stomach and brace your abdominals as if you’re about to get punched. At the same time, pull the barbell down into your upper back. You want there to be tension everywhere, right from the get go.
- Un-rack the barbell and give yourself a few steps to get into your squat position.
- Look at the floor just in front of you. Not straight down, not up at the ceiling, not straight ahead in a mirror.
The Motion
- Before lowering into your squat, take another deep breath and brace your abdominals.
- Sit down into your squat by imagining you’re sitting down on a stool. Sitting back on your heels, push your hips back and bend your knees until you have reached your end range of motion. I like to aim for at least parallel.
- On the way down and up, you want to make sure there is a nice straight line down your back and your knees are pushed out.
- Stand up and return to the start position, making sure your knees are pushed out.
- Pause briefly to re-set your brace and repeat for reps.
There you have it. You now have a guide on how to progress your squats right from using a TRX for Assistance all the way up to having a barbell on your back. The main thing is to take your time; there is no need to rush each stage; there is no need expect yourself to nail the technique and strength aspect first time; there is no need to compare yourself to anyone else. Stay consistent, enjoy your training and you’re confidence will just grow and grow and grow. You’ll be barbell back-flipping in no time.
